![]()
This is a step by step guide shows how to install and set up Dante socks5 proxy server in Ubuntu 26.04 LTS.
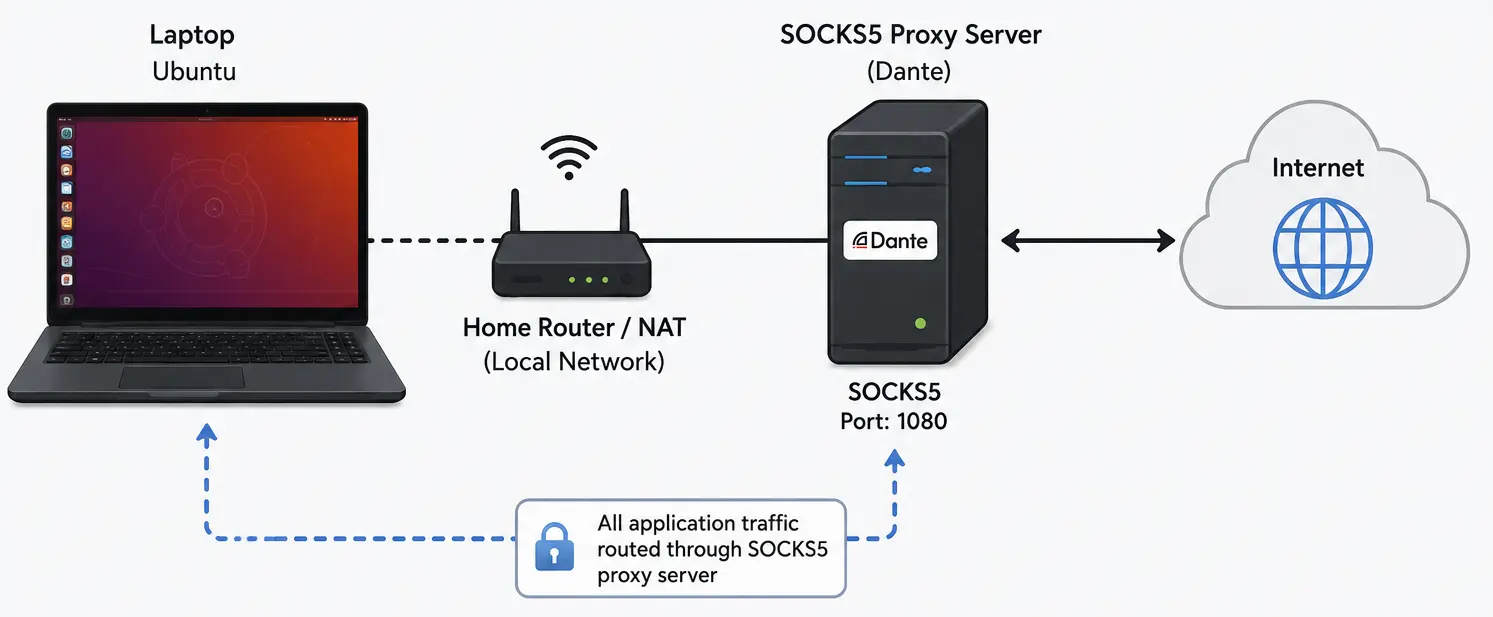
Dante is a free open-source software allowing to route network traffic between clients and servers. With it, you may bypass network restrictions, e.g., visit network resources that’re not available via direct access.
You may also use it to hide your original IP address, so that the destination server only sees the Dante server’s IP. In my case, I use dante socks proxy to reduce latency for better gaming experiences.
Prerequisites:
To follow this tutorial, you need an Ubuntu 26.04 server with sudo privileges.
In my case, I have a VPS server with 1 core CPU, 1 GB memory, and 20 GB storage.
Step 1: Install Dante Server
Dante is available in Ubuntu and most other Linux Distributions’ system repositories. To install it, connect to your Ubuntu server, then run commands below one by one:
sudo apt update
sudo apt install dante-server
After installed the server package, it will automatically create a systemd service and run it silently in the background.
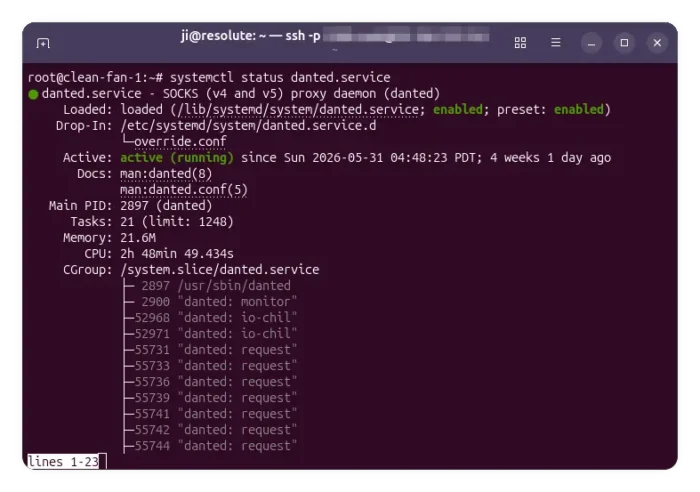
To check the service status, use command:
systemctl status danted.service
For Debian, run systemctl enable --now danted.service to enable and start the service if it’s not running.
If the service is enabled but failed to run, don’t worry, follow step 2 to edit the configuration file.
Step 2: Configure Dante Server
Dante by default loads /etc/danted.conf file for server configurations. The file by default has all configuration disabled, causing the service failed to run.
To edit the config file, you may probably firstly make a backup (or delete the file if you want) by running command:
sudo mv /etc/danted.conf /etc/danted.conf.backup
Next, run the command below to edit the file:
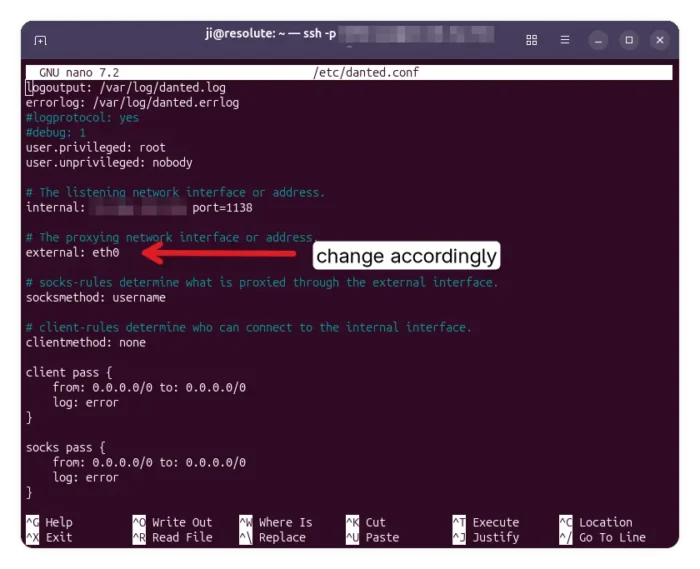
sudo nano /etc/danted.conf
The command will automatically create the file with empty content if you deleted the original file or used the mv command to backup.
When file opens, add the following content and edit accordingly.
logoutput: /var/log/danted.log
errorlog: /var/log/danted.errlog
user.privileged: root
user.unprivileged: nobody

# The listening network interface or address.
internal: 0.0.0.0 port=1080
internal: :: port = 1080

# The proxying network interface or address.
external: eth0

# socks-rules determine what is proxied through the external interface.
socksmethod: username

# client-rules determine who can connect to the internal interface.
clientmethod: none

client pass {
    from: 0.0.0.0/0 to: 0.0.0.0/0
    log: error connect disconnect
}

socks pass {
    from: 0.0.0.0/0 to: 0.0.0.0/0
    log: error connect disconnect
}
Here are more about the rules:
logoutput: /var/log/danted.log– set the access log location (optional).errorlog: /var/log/danted.errlog– set the error log location (optional).user.privileged: root– run the background service as root, it will drop privilege afterwards.user.unprivileged: nobody– run normal proxy operation with usernobody.internal: 0.0.0.0 port=1080– listen on all IPv4 interfaces on port 1080. If want, you may change the IP and port number accordingly.internal: :: port = 1080– listen on IPv6 (optional).external: eth0– replace eth0 with your server network interface name. Runip route get 1.1.1.1 | awk '{print $5; exit}'command in server to tell.clientmethod: none– means any IP in theclient pass {}can start TCP connection.socksmethod: username– you need to given username and password to authentication, even withclientmethod: none. Usesocksmethod: none(though not secure) so any IP insocks pass {}section can access without authentication.client pass { from: 0.0.0.0/0 to: 0.0.0.0/0 ...}– the first gate (TCP connection) when client trying to access dante server. It means allowing access from any IP to any network interface in server. You may usefrom: 23.168.111.125/32 to: 0.0.0.0/0, so only certain IP (23.168.111.125 in the case is your PUBLIC IP) can access.socks pass { from: 0.0.0.0/0 to: 0.0.0.0/0 ...}– control what allowed clients may do. Withsocksmethod: usernameit needs password authentication. Also, you may replace IP accordingly.
The rules above are for TCP connections. You may add more client pass {} and socks pass {} sections with following rules:
from: ::/0 to: ::/0– allow accessing from any IPv6 address.command: udpreply– allow UDP associate.udp.portrange: 40000-45000– set UDP port range.
So, it can be look like:
client pass {
  from: 0.0.0.0/0 to: 0.0.0.0/0
}
client pass {
  from: ::/0 to: ::/0
}

socks pass {
  from: 0.0.0.0/0 to: 0.0.0.0/0
  command: connect udpassociate
  log: connect disconnect ioop
}
socks pass {
  from: ::/0 to: ::/0
  command: connect udpassociate
  log: connect disconnect ioop
}

# Log UDP replies from remote hosts back to clients
socks pass {
  from: 0.0.0.0/0 to: 0.0.0.0/0
  command: udpreply
  log: connect disconnect ioop
}
socks pass {
  from: ::/0 to: ::/0
  command: udpreply
  log: connect disconnect ioop
}
After edited the file, press Ctrl+S to save, and Ctrl+X to exit.
Step 3: Create User for Authentication
For authentication purpose, you need to create a user in the server side by running the command below:
sudo useradd -M -s /usr/sbin/nologin USER_NAME_HERE
Then set a password for the user:
sudo passwd USER_NAME_HERE
Replace USER_NAME_HERE with whatever name that you want. Then, you may use the username and password to authenticate during the connection.
Step 4: Create Log Files and Change ownership
If you enabled logs, then you also need to edit the ownership of log files.
First, run command to create the log files:
touch /var/log/danted.log
touch /var/log/danted.errlog
Then, change the owner to noboby and nogroup:
chown nobody:nogroup /var/log/danted.log
chown nobody:nogroup /var/log/danted.errlog
Step 5: Configure Firewall
If you have firewall enabled in the Ubuntu server (run sudo ufw status), then run the commands below to open the ports for dante proxy server:
sudo ufw allow 1080/tcp
Here replace 1080 according to which port you use, and also run the command below if you have UDP association enabled:
sudo ufw allow 40000:45000/udp
Step 6: Apply Changes
Finally, restart the dante service to apply change:
sudo systemctl restart danted
And, do run the command below to check the service status:
sudo systemctl status danted --no-pager
Any mis-configuration in /etc/danted.conf may cause the service start failure.
Step 7: Try connecting to Dante server
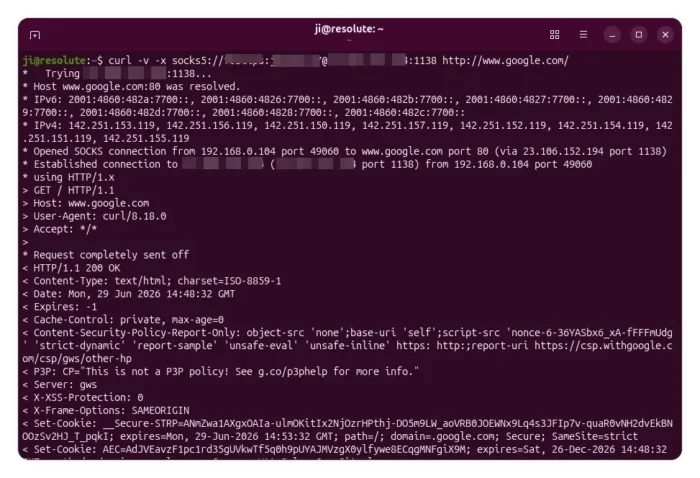
After properly set up the server, you may try running the command below in a local Linux computer to start connection:
curl -v -x socks5://USER_NAME:PASSWORD@SERVER_IP:1080 http://www.google.com/
It should output something looks like:
*   Trying xx.xxx.xxx.xxx:1080...
* Host www.google.com:80 was resolved.
* IPv6: 2001:4860:482a:7700::, 2001:4860:4826:7700::, 2001:4860:482b:7700::, 2001:4860:4827:7700::, 2001:4860:4829:7700::, 2001:4860:482d:7700::, 2001:4860:4828:7700::, 2001:4860:482c:7700::
* IPv4: 142.251.153.119, 142.251.156.119, 142.251.150.119, 142.251.157.119, 142.251.152.119, 142.251.154.119, 142.251.151.119, 142.251.155.119
* Opened SOCKS connection from 192.168.0.104 port 49060 to www.google.com port 80 (via 23.106.152.194 port 1138)
* Established connection to 23.106.152.194 (23.106.152.194 port 1138) from 192.168.0.104 port 49060
* using HTTP/1.x
...
For a graphical socks5 client, I use proxifier, which however is NOT a free software. You may try the free open-source ProxyBridge that works in Linux, Windows, and macOS.
source https://ubuntuhandbook.org/index.php/2026/06/install-dante-socks-v5-proxy-server-in-ubuntu-26-04/


Tidak ada komentar:
Posting Komentar